Brick Emu
A LEGO MindStorms RCX Brick Emulator
This is an emulator for LEGO MindStorms RCX bricks. It emulates processor and peripherals, so it runs the original ROM code, firmware and programs. In principal it should work with any firmware, but I only tested brickOS. It also has some special features that only works when brickOS is installed.
The emulator is currently only available as source archive. It was tested under Linux and Windows (cygwin). You need gcc and perl to compile it and Tcl/Tk to run it. To get sound you need SDL.
Of course, you also need a firmware and a program you want to run on the emulated brick. To compile your own programs you also need the h8300 compiler suite. Personally I use brickOS, see their web page for more information.
Screenshot
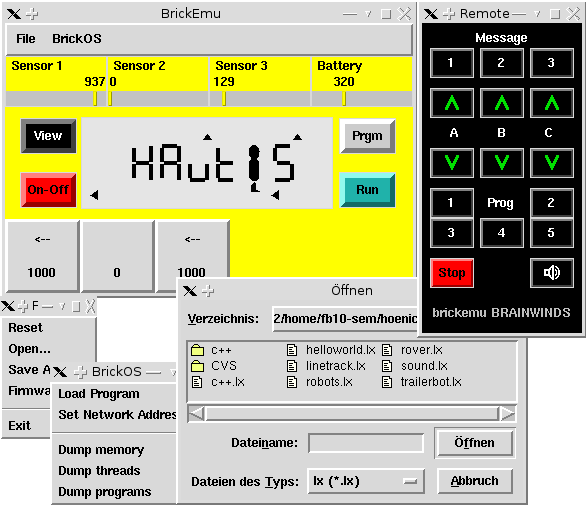
This screenshot shows the hello world program coming with brickOS. It was taken before the sensor input was implemented. This is why the sensor and battery indicators are displayed.
The next screenshot shows the remote control and the file menu where you can load firmware and programs to the emulated brick.
Quick install instruction
Apply the patches that add brickemu support to brickOS and rebuild brickOS. The patches add socket support to dll/firmdl3 (for downloading via simulated infrared server) and debugging support to the brickOS Makefiles.
tar -xvzf brickos-xy.tar.gz
tar -xvzf brickemu-xxxxxx.tar.gz
cd brickos
patch -p0 < ../brickemu/*.diff
You may also consider to install my other brickOS patches now.
./configure
make
make install
Now build brickemu.
cd brickemu
make
export BRICKEMU_DIR=`pwd`
export BRICKOS_DIR=/usr/local
export TOOLPREFIX=/usr/local/crossgcc/bin/h8300-hitachi-hms-
./ir-server
wish GUI.tcl -firm /usr/local/lib/brickos/brickOS.coff
BrickOS now includes its own ROM image written from scratch.
However, if you want a more precise emulation, you can remove
rom.bin and put the original ROM image into
rom.srec (in SREC format), or rom.bin (in
binary format). You can get a program at http://www.crynwr.com/lego-robotics/rom-image.html
that extracts the image from your RCX.
You can set BRICKEMU_DIR if you want to start emu from another directory. This directory should contain the rom image, GUI.tcl emu and ir-server. You should also adapt BRICKOS_DIR and TOOLPREFIX to match your installation. I recommend to put the last five commands into a small script that starts brickemu.
There are two possibilities to download firmware and programs. The easy way is to choose "Firmware..." and "Load Program..." from the menu. The hard way is to use the modified firmdl3/dll utilities and is not recommended at all.
With "Firmware..." you can load either coff or
srec files. I recommend to use coff files
as these come with symbolic information, which is used by brickemu to
determine the location of memory, program and thread data structures.
The "BrickOS" menu will only work if you loaded a brickOS firmware
from the coff file. You should find brickOS.coff in the
same directory as the srec files if you applied the patches to
brickOS.
The menu entry "Load Program..." can load either .lx files or .a files. I strongly recommend to load .a files as these include symbolic information and are always linked to the correct firmware. A rule to create them was added to the brickOS patch.
IR support
The emulated bricks support IR communications and if you start
several instances of "emu" they can send each other
messages. You can also inject messages yourself by connecting to port
50637 (the magic lego port). All data is sent as raw bytes and
repeated to every one who is connected to this port (including the
sender). This emulates the broadcasting nature of infra red.
The distribution contains a simple remote control (remote) that
emulates the remote control from the Ultimate Accessory Set. You
start it by invoking "remote" and it will control all
emulated brick.
You can also download the program and firmware via IR with the standard brickOS utitilies. You need to patch the utilities so they can also write to a network socket instead of the serial port, see above. Then you just download the firmware and program as you do it on your real RCX, only the tty needs to be changed.
cd brickos
util/firmdl3 --tty=tcp:localhost:50637 boot/brickOS.srec
util/dll --tty=tcp:localhost:50637 demo/helloworld.lx
This will download the firmware via TCP/IP and emulated infrared controller (this is what ir-server is good for). Since the emulator runs in real time this will take a while.
Debugging
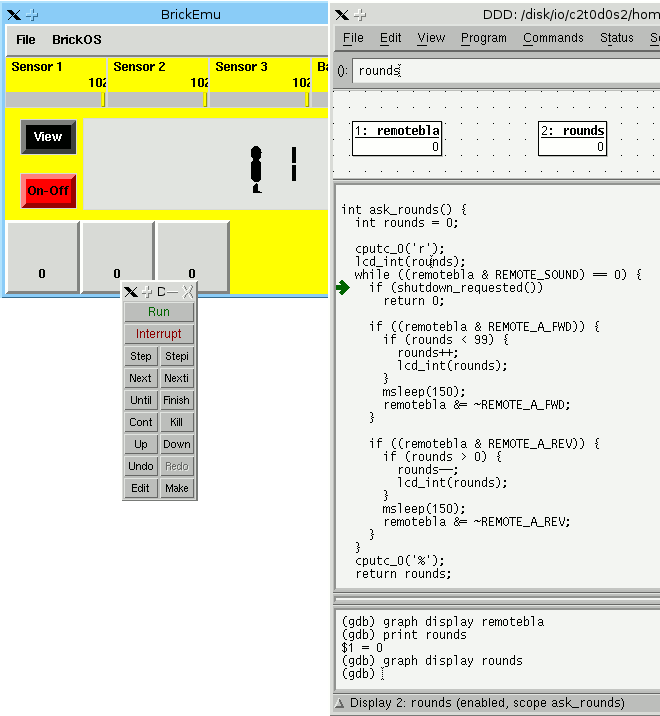
With brickemu it is possible to debug your code or brickOS itself
with gdb or the graphical debugger ddd. Of
course, you need to compile a debugger targeted to the Hitachi H8300
Platform. So the first step is to download gdb
and to compile it. I tested it with gdb-5.0, however, you may also
try the latest release.
tar -xvzf gdb-x.yz.tar.gz
mkdir gdb-h8300
cd gdb-h8300
../gdb-x.yz/configure --target=h8300-hitachi-hms
make
su root -c 'make install'
You also need ddd. This program is platform
independent, so you can use the version that comes with your
distribution.
Normally brickOS is compiled without the `-g' debugging flag.
So to get symbolic information in brickOS and your own programs apply
Makefile.diff, which comes with the brickemu
distribution. Then rebuild brickOS and reinstall (if you have followed
the instruction above you have already applied the patch).
You have to load the brickOS firmware as coff file as described
above. Build your own programs with `.a' ending instead
of `.lx'; the extra rule is already in Makefile.user if
you applied the patch:
make program.a
You can load .a files to the emulated brick via the brickOS menu.
Select Debug from the file menu, which will start
ddd (telling it where it can find the brick via
.gdbinit). This will also freeze the brick until you
select `continue' in the debugger. You can now debug the program
similarly as you debug programs on your PC. There are a few
differences though, e.g. the debugger cannot start or stop the
program. Before seleting `continue', you should set a break point, e.g. on
the main function. Now press the run button on the virtual RCX and
wait until the break-point is reached.
When the emulator detects illegal memory access it will also be reported to the debugger. If no debugger is running brickemu waits until one connects. You can also force entering debugging mode by pressing Ctrl + Backslash or sending a QUIT signal to the emu process. Or you can start the emulator with "./emu -d". When it waits for the debugger you can start it in another window like this:
h8300-hitachi-hms-gdb brickos.coff
(gdb) target remote localhost:<debugger port nr printed by emu>
Profiling
Brickemu profiles your program and operating systems while running it. After you closed brickemu you should have a look atprofile.txt. It contains the number of cycles spent in
each function and which functions it called (functions marked with I
are interrupts).
Download
Copyright (c) 2003-2005 Jochen Hoenicke
This program is free software; you can redistribute it and/or modify it under the terms of the GNU General Public License as published by the Free Software Foundation; either version 2, or (at your option) any later version.
This program is distributed in the hope that it will be useful, but WITHOUT ANY WARRANTY; without even the implied warranty of MERCHANTABILITY or FITNESS FOR A PARTICULAR PURPOSE. See the GNU General Public License for more details.
TODO
- support other kinds of sensors.
- fix timing problems with infrared communications.
- load/save functionality still buggy.